EHTracker/Making a New Torrent
This is a step-by-step guide explaining how to create a new torrent for a gallery using EHTracker.
Getting Started
Get a Torrent Client
A torrent client is a program which allows someone to interact with torrent files and the BitTorrent ecosystem in various ways. There are many torrenting clients available for various operating systems. Most of these clients will allow you to make a torrent file (an ability necessary to follow this guide).
Find a Gallery
There are several reasons why someone might want to make a torrent for an E-Hentai gallery. Many galleries which lack an associated torrent. These gallery cannot be downloaded via torrenting, unless a torrent is created for them. Additionally, some galleries may have torrents that are insufficient in some way (e.g. undersized images, images out of order, lacking additional non-image content, etc.).
Composing the Files
Naming the Files
Files should be named in a logical way, so that anyone's computer can automatically sort the files from beginning to end (for easy reading). This is most easily achieved by naming the files with numbers, like:
- "001.png"
- "034.png"
Or for particularly large galleries:
- "0001.png"
- "0999.png"
Alternatively, if preserving the original file names is desired, use a number prefix instead. This might look like:
- "001_filename.png"
Note the padding of the number with zeroes at the beginning. Some computers may organize numbered files poorly (e.g. a list that goes: 1, 11, 12, 13, 2, 3, 4...), and so padding numbers with zeroes helps maintain proper order.
The named order of the image files should be the same as the order of images presented in E-Hentai, unless that order is provably incorrect somehow (i.e. pages out of order). If a file is being included which is not viewable in the gallery online, name it such that it does not interfere with the order of the image files. Exceptions to this may be made for things like videos which are intended by the author to be viewed in-between images.
![]() If the files in the torrent are an Archive of resampled 1280x images, append "-1280x" to the end of the name of every file acquired from said archive.
If the files in the torrent are an Archive of resampled 1280x images, append "-1280x" to the end of the name of every file acquired from said archive.
Naming the Torrent
The torrent should be named as close to the name of the original gallery as possible.
![]() If the files in the torrent are an Archive of resampled 1280x images, append "-1280x" to the end of the name of the torrent.
If the files in the torrent are an Archive of resampled 1280x images, append "-1280x" to the end of the name of the torrent.
Compressing the Files
Once you have all of the files you wish to put into this particular gallery's torrent, it is good etiquette to create a single compressed file storing those files. There are several compression formats available, with Zip and 7zip being among the most popular. Choose any format you like, but keep in mind that you want other users to easily extract those files once they download your torrent. Don't choose a format that is too obscure!
From this point forward, the set of all files which you intend to put into a torrent for a particular gallery will be referred to as a "bundle of files". This is because this wiki cannot predict whether you compressed your files or not, and what kind of compression you used.
There are some reasons to not compress the files, and instead torrent an uncompressed folder of files:
- If the torrent fails to download completely, with separate images you'll likely still have some complete files. With a compressed file, all you'll have is a single corrupted archive.
- If the gallery is updated with more images, you can just re-torrent the same folder. Anyone who downloaded the old torrent won't have to re-download the existing files, only the new ones. With With a compressed file, you'll have to create a completely new archive that has to be downloaded again from scratch.
- Similarly, if people already have some of the files (from other galleries, or downloaded by different means), they can put them in the torrent folder and instantly get partial completion (and only use the torrent to download the rest). With a compressed file, that's not possible.
Making the Torrent
Create a New Torrent File

Once you have your bundle of files, return to your torrent client of choice. Somewhere in the client will be a tool for creating new torrent files; open this tool.
- Using the tool, select the bundle of files you wish to turn into a torrent for your chosen gallery.
- In the "trackers" field (which may be named something similar but not identical in your chosen torrent client), paste the customized EHTracker announcement URL unique to your chosen gallery. Make sure this tracker announce URL is correct!
- This URL is most quickly found at the bottom of the window opened when clicking on a gallery's "Torrent Download" link.
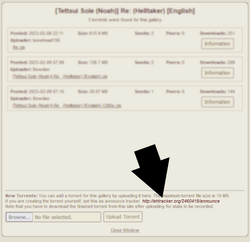
This is where the unique EHTracker announcement URL for a gallery is located on the the "Torrent Download" pop-out window. - This URL can also be generated by following the format of: http://ehtracker.org/{galleryID}/announce, where {galleryID} is the gallery ID number that E-Hentai has assigned to a specific gallery.
- This URL is most quickly found at the bottom of the window opened when clicking on a gallery's "Torrent Download" link.
- The other fields do not need to be filled in. If you think there is something notable about your torrent (e.g. a file in your bundle of files that cannot be displayed by E-Hentai), you can add a comment about it if you wish.
- The torrent does not need to be private or encrypted. Furthermore, options like "Piece size" may be left Automatic.
- For your own convenience, it is recommended to uncheck the option to "Begin seeding immediately" (or similar option). This will not affect your torrent file. It will stop your torrent client from trying to upload your torrent immediately. The reason why this is useful will be apparent soon.
- Now create your torrent file! Save it somewhere easy to access, as we will need it very soon!
- The action of creating this torrent file may automatically add it as a torrent to your torrent client. This will be inconvenient for you soon, so please remove its entry if it appears in any lists on your torrent client (but don't delete the torrent file itself!).
Upload the Torrent File
Now that you have a torrent file for the gallery, return to that gallery's listing on E-Hentai and do the following:
- Click on the "Torrent download" link to open a pop-out window listing that gallery's torrents.
- Look at the bottom of that pop-out window to find a file selection field. This will allow you to upload your torrent file to E-Hentai.
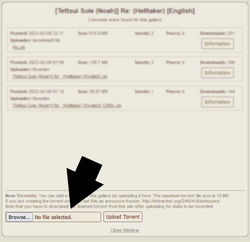
Here is the file selection field on the "Torrent download" pop-out window. - Click the "Browse..." button to select your torrent file for upload.
- Once selected, upload it by clicking the "Upload Torrent" button and waiting a few moments. Soon, E-Hentai will automatically present you with a Personalized torrent file, which you should save somewhere safe for the next steps.
- The torrent file you just uploaded is now useless! It is best to delete it, as it is for all intents and purposes a duplicate of the new Personalized torrent file that E-Hentai just gave you.
Begin Seeding the Torrent
Now that you have announced to the EHTracker that you have made a torrent for a particular gallery, you should make it available and begin seeding it!
- Take your bundle of files and place them somewhere safe and memorable. It's generally a good idea to place them in your offline stash alongside other downloaded galleries, but how you organize your files is your business.
- Open the Personalized torrent file using your torrent client. Now, you should be presented with the screen for adding a new torrent to your torrent client.
- Add this torrent to your torrent client, using the appropriate settings.
- Your torrent client should ask for the directory (a.k.a. "folder") containing your torrent's bundle of files. Point the torrent client to the same safe and memorable location that you stored your bundle of files in during Step 1.
- Be sure to enable the option to "Start torrent" (or something similar), so that your torrent beings seeding immediately after you finish this initial torrent configuration.
- Once added, you will automatically begin seeding the torrent you just made. Congratulations!